
Why oatmeal? I always used to put shredded coconut into my fudge, but now I'm trying to avoid fat and coconut is supposed to be have especially bad fat in it. Fudge without anything in it is great, but it goes down too fast. The coconut gives something to chew on and makes the piece of fudge last longer. So I was searhing for something to put into my fudge to make it last longer. Nuts are nice, but they have fat too, and they don't have the same effect of making the piece last longer.
Crisped Rice came to mind as a possibility, and I had tried it long ago. It was a disaster. The crisp rice ended up soggy rice in the fudge. Then I thought back to the early sixtier when I was a kid and we drove to Lake George Colorado to visit Aunt Abbey and Uncle Irving. Aunt Abbey made chocolate oatmeal cookies that were a lot like fudge with oatmeal in them. My family has ever since referred to Aunt Abbey's Cookies. I don't have the actual recipe, so I decided to develope a recipe for oatmeal fudge, and this it the result.
Since I'm trying to eat low fat, I used non-fat ingredients in the recipe wherever I could. I expect that if you used cocoa with fat in it as opposed to non-fat and regular evaporated milk that you wouldn't notice a lot of difference in the final product. You might even consider adding a tablespoon of butter with the vanilla if you feel daring.
Cooking to the correct temperature, and thus the correct water content when making candy is important. The picture below is my new TruTemp® Candy - Deep Fry thermometer made by Taylor. I got it at Target for under $10. (I usually shop Wal-mart, but they don't carry a good candy thermometer as far as I was able to determine.) I have two Taylor Candy thermometers from 25 years ago or so that were about twice that back then. My initial impression of the new one was that it was not as well made as older ones. The older ones have engraved markings that have been painted in with black to make the engraving easier to read. The new ones just have the calibration markings printed on the metal. After using the new one for a while I now think it is at least as good as the old one, plus it was a lot cheaper. The old ones seem to be calibrated better from the factory though, as I don't recall the boiling water test ever being off by more than one or two degrees F. The new one never seems to vary more that one or two degrees either, but it's not from 212 F where you would expect it but from 215 or 216. That doesn't really matter though as long as you compensate for it when you are cooking your syrup.
Testing the thermometer in boiling water.
Stir the syrup over medium heat to keep it from burning until it starts to boil, then turn the heat to low and stop stirring. Once it's boiling put the candy thermometer into the syrup and keep an eye on it to be sure it doesn't boil over. I used 3 cups of sugar in this recipe to match the size of the 3 quart copper bottom stainless steel sauce pan I cooked it in. There is enough syrup to cover the bulb on the thermometer so it gets a valid reading, and there is not enough so that it boils over.
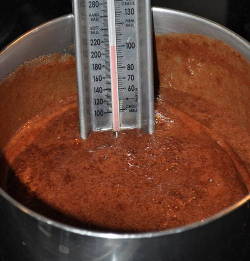
This is right after the syrup started to boil and the thermometer was put into the pan.
As the syrup boils it swells as the steam bubbles in it increase the volume in the pan.
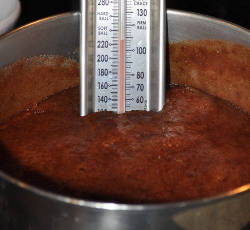
This shows the increase volume of the syrup as it moves up the thermometer from where it was when it first started to boil.
As the syrup approaches the final temperature the boiling rate slows and the volume of the syrup goes down as there is less steam being generated to keep it inflated. This next picture shows the decreased volume as the syrup is almost at the desired temperature of 231 F. The thermometer is showing 235, one degree less than the desired reading of 236 for a true reading of 231. The first picture of the thermometer test shows 217, 5 degrees above the 212 degree F boiling point of water, so 5 degrees need to be added to the desired final syrup temperature for the recipe to get the reading to aim for on the thermometer.
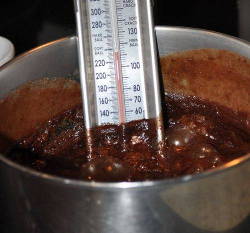
The syrup at nearly the final temperature. It has collapsed down in volume to nearly what it was when it first started to boil.
The first couple times I worked on developing this recipe I burned the syrup slightly when I was cooking it as I didn't turn the heat low enough after it started to boil. I have an electric stove, and now I cook it on 6 and stir it occasionally to keep it from burning until it begins to boil. Once it's boiling I turn it down to 2 and stop stirring. This is also when I put the thermometer in it, until it starts to boil the thermometer is just in the way when you're stirring and is not needed.
If you burn the syrup slightly it's not a problem. The burned stuff sticks to the bottom of the pan, so as long as you don't scrape any of it off the pan and mix it into the good non-burned syrup all you need to do is pour the syrup out into another pan to cool when it's done cooking. I used a frying pan to do this and got in the habit. I'm probably influenced by the fact that it gives me two pans to enjoy with a spoon when I'm cleaning up instead of just one. The frying pan also has more surface area so the fudge will cool a little bit faster, but there is no real reason why you can't add the oats into the pan you have cooked in as long as you are sure that you don't have anything burned to the bottom of the pan.
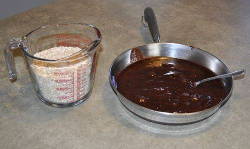
This shows the syrup in the frying pan, with the quick oats in a measuring cup ready to be added to the syrup.
Dump the oat onto the syrup.
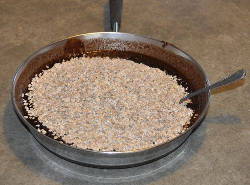
When you pour the oats onto the syrup, they float on top.
Stir the oats in carefully so you don't spill things out of the pan.
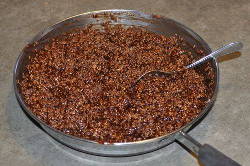
All mixed together, oats and syrup.
After the mixture has cooled down stir it until it starts to set. The stirring is important as it starts the hardening process. Without the stirring it will stay syrup, just get thicker and thicker. When it starts to harden the surface won't be as glossy, and rubbed between the fingers it feels less greasy. If you have worked the cooling syrup enough the hardening process is relatively rapid. If you haven't worked it all then the portions worked will harden first and the hardened areas will gradually grow until all has hardened.
Once it has started to harden, scrape it into the final pan to harden. The one in the picture is 7 1/2 by 13 inches and is about the right size for this recipe. I said to scrape it, since when it starts to harden it's too thick to pour. It ends up in a lump in the pan as in the next picture that can be spread out into an even layer to harden.
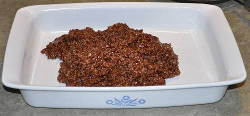
The fudge in the final pan before being spread out.
The final product in the pan to harden. I recommend that you cut the pieces while it is still not fully hardened. If you wait then it's apt to break rather than cut where you want it cut.
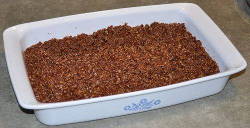
The final product, hardening in the pan, ready to be cut into pieces.
Mix the cocoa well with the sugar before adding the liquids.
cook to 231 degrees Fahrenheit then add
stir the Vanilla in, then add
stir the oats in and mix well, allow to cool to lukewarm (under 120 F,) then work the syrup by stirring until it begins to harden.
If you want to comment on this site, you can send email to scl@kincaidbooks.com